So, now that you know the theory of film making and the skills required to make a film, its time to start! Below is a ten step process for making your film with thanks to Melissa Knight. Each step is just as important as the others, so don't go skipping ahead to filming just because is the most fun part of making a film! Good Luck!

Step 1: Brainstorming
Think about the purpose of your story.
Is there something in your life (good or bad) that you would like to tell the world about? Perhaps your family is going on an amazing holiday and you want to make a documentary to remember it by? Maybe Year 12 is starting to stress you out and you want to unwind by creating a music video for your favourite song? Or it might be something as simple as asking a friend for an idea?
Make a spider graph (or brainstorm) and think of key words, events and images linked to the issue. How do they connect and relate to each other? You might want to look in magazines and newspapers, or search the internet for related articles. Try Googling key words such as ‘Top-up Fees’, ‘Rent Trap’, ‘EMA Cuts’, or ‘Housing Benefit Cap’ and see what comes up.

Step 2: Planning
Now you have a rough idea of the theme of your story, take some time to explore how you want to say it. Do you want to make a documentary? Or do you want to make a drama? Do you want to use animation?
Who else needs to be in your film? Do you need other participants and how old are they? If they are under 16 years old, then you will need to have permission from their adult parent or guardian to allow them to take part in your film. What is your budget and schedule? Do you have equipment? Time? People’s time? Places? Will you need permissions for non-public locations?
You probably won‘t able to answer all of these questions now. Grab a friend, relative or teacher and share your ideas with them. Keep talking and things will evolve. Use a notebook and note your ideas as they pop in your head or you’ll lose them.
Step 3: The Story
Now you can begin to piece together your story.
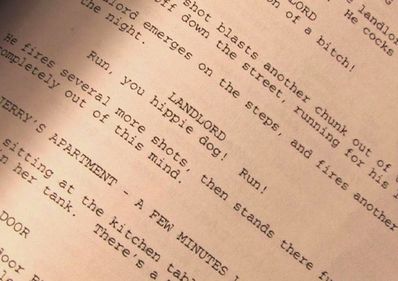
You will need to form a script (Download Script Template). You might want a tight script where actors speak word-for-word or you may wish to have the characters improvise, giving them an idea of what it is you want them to say and see their what comes out!
If you are making a documentary, now is the time to research the people you want to interview and come up with appropriate questions to ask. If you are interviewing a young person, you may wish to ask them how they feel about their job or education prospects.
Now you can begin to piece together your story.
You will need to form a script (Download Script Template). You might want a tight script where actors speak word-for-word or you may wish to have the characters improvise, giving them an idea of what it is you want them to say and see their what comes out!
If you are making a documentary, now is the time to research the people you want to interview and come up with appropriate questions to ask. If you are interviewing a young person, you may wish to ask them how they feel about their job or education prospects.

Step 4: People
Who are the characters in your story? Take some time to make a family tree of your characters and think about how they link together. Think about their backgrounds.
Try and make them as real as possible: What will they wear, eat and drink? What is their family like? Why are they in the film and what are they saying to the audience? You may have some key words or phrases they will say.
If you are making a documentary, identify people to talk to. The more senior the figure, the more time you need to book in an interview slot. Remember, if you are not using your own film equipment, then it is a good idea to book your filming dates close together. Give yourself plenty of time to film each interview. You may find your interview lasts an hour but you only use 40 seconds in the final cut. All people appearing on camera need to have a release form, Download Release Forms.
|
Step 5: Framing
The way that you shoot the film is an important part of getting the film right. Now is the time to experiment with basic camera angles. If you can't remember the different angles, have a look in the theory section or use the gallery to the right. If you have never filmed before, take some time to practise these shots before making your film and see how they can relate to what you want to say. If you are interviewing you might wish to do some extreme close ups of hands or the facial expressions but remember to do these after the interview or have a second camera remaining the whole time on the interviewee’s face. |
|

Step 6: Storyboards
Now you have an outline of a script, and an understanding of the various camera angles and shots you can use, you should begin to merge these to break your story into scenes to make a storyboard.
A storyboard looks like a comic book, with pictures of scenes and a description of what is happening in the picture and/or some dialogue.
A good storyboard will piece together the beginning, middle, and end and help you to think of how to visualise each scene using which camera angles and shot sizes. _Download Storyboard Template.
Step 7: Scheduling
This is probably the trickiest part of film-making.
Now you have your storyboard, you may find some of your scenes happen at different times in the story but in the same location. This means when you make a schedule of filming your scenes, that you do all of the different scenes in the same location on the same day. Be careful! You characters may need to be wearing the same clothes for different scenes on different days that in the film are the same day. This is called ‘continuity’.
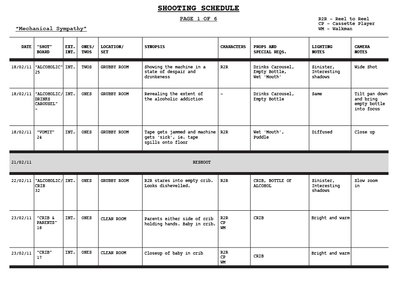
Filming takes longer than you think! Try to film one scene from your storyboard and this will give you an idea of how long it will take to film the entire film. Download Shooting Schedule Template.
This is probably the trickiest part of film-making.
Now you have your storyboard, you may find some of your scenes happen at different times in the story but in the same location. This means when you make a schedule of filming your scenes, that you do all of the different scenes in the same location on the same day. Be careful! You characters may need to be wearing the same clothes for different scenes on different days that in the film are the same day. This is called ‘continuity’.
Filming takes longer than you think! Try to film one scene from your storyboard and this will give you an idea of how long it will take to film the entire film. Download Shooting Schedule Template.
Step 8: ACTION!
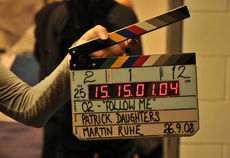
Now comes the fun part: filming.
Try and film the same scenes from different angles so that when you edit, the audience will have different things to look at. If you only use one camera, film the same scene several times from different angles. Be prepared to have hours of footage for what will be your final 3 to 5 minute film. Allow for around two hours of filming per scene or per 30 seconds you will use – this is based on our previous experience of filmmaking.
Time coding is also really crucial for when you begin to edit your film. You need to have a pen and paper ready to record the various takes of your scenes and record the time codes next to them (this is the time set on your video camera) so that when you come to edit, you know that, for example 19:13 (19 minutes 13 seconds) was your best take for scene 5. If you are using a phone or digital camera, you may find it best to simply delete the scenes as you go along so you only have the ones you felt worked. But be careful of deleting scenes too early! You may need some other angles and though the whole scene may not be how you wanted it, you could edit two not so perfect scenes to make the perfect final cut.
Step 9: Post Production
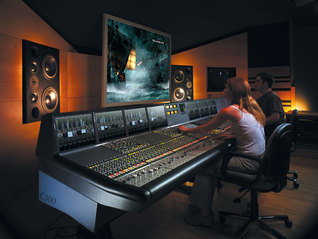
Now comes the most time-consuming part: Editing or post-production.
You now have your script, storyboard, schedule and your time-coded notes on how all your scenes went. Using all your resources, you can begin to piece together your film.
If you are new to editing, get it contact with us via the form below and we can organise a time for a media teacher to help you through the editing process. Open Source software is available, or check out Movie Maker with Windows or Apple iMovie. If you are editing at school, look at Adobe Premiere Pro.
Feedback: Once you are happy with your rough cut, review it to people who can give you an honest opinion. Use these comments to polish up your rough cut until you have your final cut, making sure you have all the information you wanted to convey in the film as well as continuity and that the final film is under three minutes long.

Step 10: Submission
So you have your film and it is polished and ready to submit. Congratulations!
Before you upload it to our Moodle Site (enrolment key is nmhs2016), make sure you have all the permissions you need, including any signed release forms that show us the people in your film have agreed to take part and to be entered into a film competition (there is a spot to upload these on the page). Make sure you review our terms and conditions once again to make sure that you have met all the criteria. You can read them here.
Once you are happy, upload your film, pat yourself on the back and relax!
Deadline 5pm, Friday 4th November 2016